MAKING A SPIRIT HOUSE
 The Thai people make spirit houses for their departed loved ones, a custom that I felt was interesting and creative. I wanted to make my own versions, really mixed-media art, that took a crafter's memory box up to another level. I chose a small jewelry cabinet from Michaels, but it could be anything (bird house kit, small doll house, or even a plain roombox made for miniature scenes). A very nice handmade architectural style of room box is available at Steve Harvey Miniatures (see the links at the end). You only need to create an illusion of architecture.
THE EXTERIOR
On the previous page, you see the structure on top of the cabinet is simple: made from foam core, covered with Golden's Light Modeling Paste to simulate adobe and a "tin" roof of aluminum foil glued (with US Artquest's Artists Cement) to cardboard. The paint finish is made to look like weathered but brightly painted adobe. The doors are to simulate an adobe wall's gate opening onto a courtyard garden. The balcony rail is wood cut for model makers, though here you can also use building materials made for dollhouse enthusiasts. There are miniature plants on the little balcony to add to the illusion. At the end, I will supply you with links to good places to find these materials. All you need is a hollow space inside any sort of object. I chose the Southwestern style adobe house because it reminded me of some of the first crafting projects my cousin Becky made, and I traveled enough in New Mexico to know this kind of structure well. The important thing is to pick a style that matches how you feel about the person you want to remember. For me, a grief project helps me heal and channel negative feelings into something positive.
THE INTERIOR
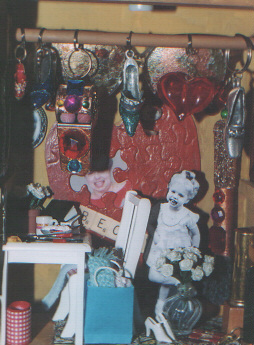
I designed the interior of my spirit house while making the outside. I knew I wanted to install a dollhouse light on the "ceiling" so before anything, tape wire had to be run inside and through a small groove to the outside back. It is simple to learn and you can buy good instructions from Cir-Kit Concepts (the link is at the end). I think the interior light makes the spirit house special, and very dramatic at night. Then you can paint the interior. You must do the walls and floor first, before filling the space up with objects, since it is advisable to permanently attach everything once you are happy with the placement. I made a faux finish to look like painted adobe inside, then glued on miniature photos placed in dollhouse frames, drilled holes where I planned to hang a pair of glasses with gilded lenses, and lastly glued down a jigsaw puzzle heart collage to the back wall. After the walls were done, I glued miniature carpets to the floor with tacky glue. I spelled her name out with scrabble style collage letters.
FILLING THE INTERIOR
First choose the miniature scene you wish to create. You can find minis on every sort of subject and style for men, women and children. You only need the barest essentials to start, and then add on things later. I chose a crafting table with happy signs of a shopping binge around it for Becky and kept adding to that scene over a year. You are going to put that scene in one compact area and then add the personal objects and pictures later. It would amaze you just how many things will fit into a small box! I started with just the table and chair. Becky loved shoes, so I added a little collection of shoe keyrings and some miniature shoes I found online. My cabinet came with a removeable dowel, but it is easy to attach one in any sort of box (let me know if any one wants more instructions for this).
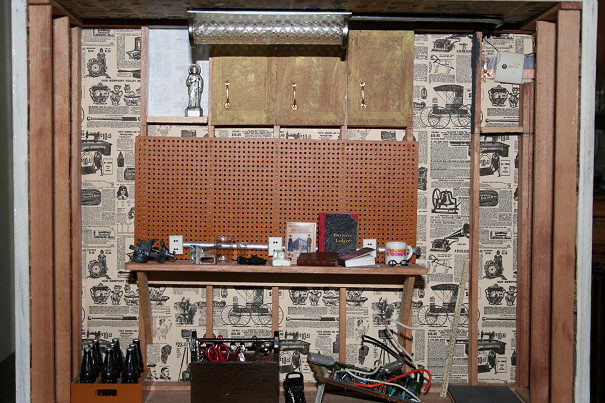 The personal objects you add to this scene are the most important, yet sometimes the least of a person's belongings. For Becky, I chose makeup, makeup brushes, a tiny perfume bottle, broken jewelry, a broken watch, charms and tiny things she kept to embellish her craft projects. The gilded lenses on the glasses look spectacular. I made a garage workshop in Mary Kay Gentile's class and realized it was perfect for my Father's spirit house. Of course, I got most of my treasured objects from his junk drawer, though I am amassing all sorts of accessories I don't know how to make yet. He was an electrician, so I am also using the innards of old gadgets and telephones. It's the same with what I plan for my Mother. Choose small objects that won't dwarf the miniature scene. Then have fun moving things around. Get creative and use screw eyes and hooks to hang some things on the "walls" or from the "ceiling." When you like what you see, then it's time to glue things down (or wire them, or hang them). Work from back to front. Never let excess glue show. I keep toothpicks nearby to swipe away any excess glue. Always use as little glue as possible. Too much, even if it doesn't show can make a miniature object sit at an unnatural angle, ruining the illusion. Use the right kind of glue. Superglue only works when surfaces meet exactly. Tacky glue works on lots of things, but epoxy is best for metal and glass. If an object is heavy, wire it through drilled holes (or use heavier fishing line).
THE PHOTOGRAPH
To add to the illusion of reality, in spite of the larger "real" objects around the miniature scene, it is good to add an image of your loved one. It is best to be full body and standing. If you only have the top of a person to use, then you have to place it behind something else.I chose my favorite picture of Becky when she was around five, because her playful laughter never changed. So I made her only a little larger than the chair. Color copy a photo the right size (miniatures mostly come in 1/12 scale; one inch equals a foot). Glue this to black cardboard--I use black mat board because it is quite stiff--and gently push out any bubbles with your finger or a brush. Do not get glue on the surface (the faint-hearted can use a glue stick but I don't recommend it). Let this sit under a few books overnight with paper towels around it. When it is dry, gently cut the figure out and run the side of a large Black Sharpie around the edges to cover the white edge of the paper (never use the tip or you could ruin the picture). To make the support, you want a half inch strip of black cardboard (not as stiff as the mat board) and bend it to shape a triangle that has one right angle, and is long enough (about five inches) to overlap on one side for a good glue connection. You will glue it first to form the triangle (clamp the overlapped edge with a paperclip or clothespin). When dry, glue the triangle to the lower back of the photograph so that the triangle sits flat on the floor. This is what holds the photograph upright, and the part that touches the floor is what you are going to glue down. I used blue painters tape to hold it down while it dried. Carefully place objects around your picture so that you don't notice the feet or the triangle that holds it up.
 |
Useful links for materials:
|
 |